A concrete crossover is the bit of your driveway that runs over the council-owned nature strip, connecting your property to the road. It's easy to overlook, but this small section is a critical piece of public infrastructure. It has to meet strict council standards for safety, drainage, and durability, so getting it right is non-negotiable.
The Critical Role of a Compliant Crossover
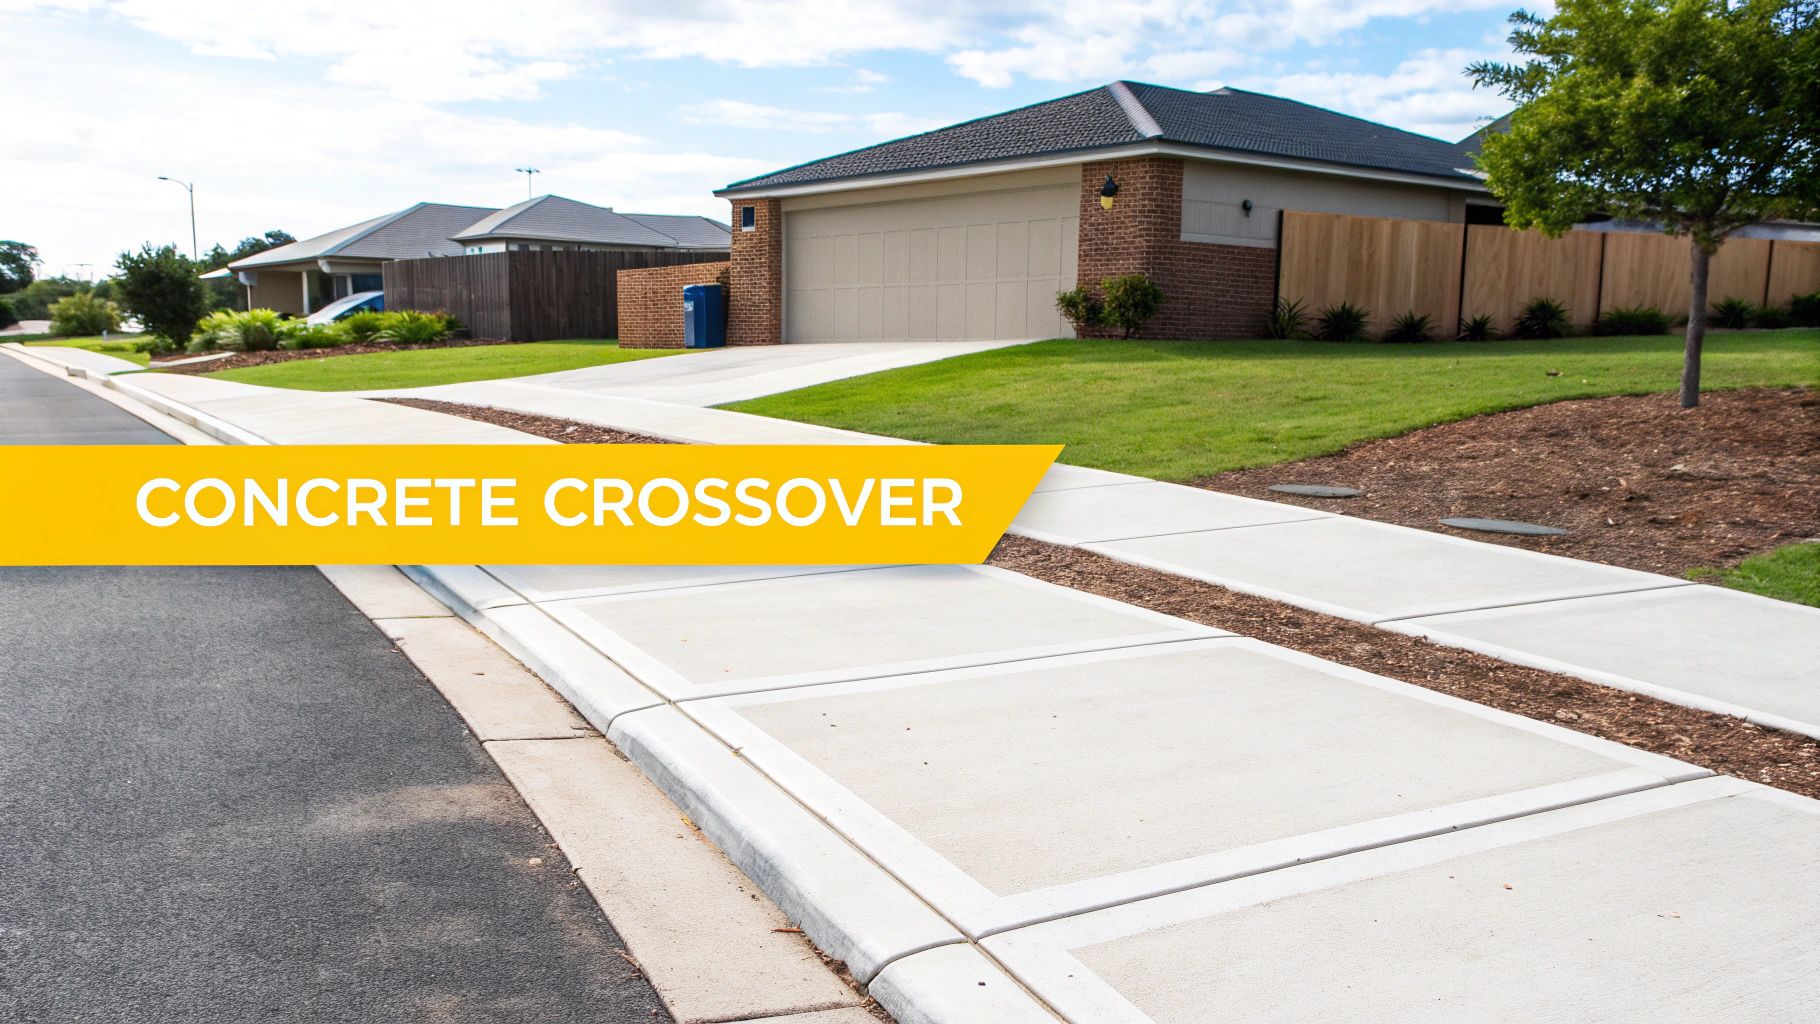
Most people just see a crossover as the end of their driveway, but from a council's point of view, it’s a public asset built on public land. This is precisely why bodies like Central Coast Council or the City of Newcastle have detailed specifications that are worlds apart from a standard driveway pour. Crossovers are an essential part of property access, often linking up to larger concrete driveways.
Let's say you're putting in a new garage on your block in Gosford and need a new access point from the street. The driveway inside your property line is your business. But the moment it crosses the footpath and verge, it becomes a crossover. The council needs to be absolutely sure it won’t crack under a garbage truck, create a trip hazard for pedestrians, or cause water to flood the footpath.
Why Council Specifications Matter
Councils carry the responsibility for the safety and integrity of all public infrastructure. A poorly built crossover isn't just a minor issue; it can cause serious problems that ripple out well beyond your property line. Getting it right the first time saves you a world of future headaches and potential costs.
A professionally built crossover ensures:
- Public Safety: It creates a smooth, safe surface for pedestrians, prams, and mobility scooters, eliminating dangerous cracks or uneven joints on the footpath.
- Asset Protection: It safeguards the underground services—like water pipes and communication cables—that often run just beneath the verge. The right concrete thickness and steel reinforcement are crucial to prevent damage to this vital infrastructure.
- Proper Drainage: The crossover must be graded perfectly to channel stormwater into the street's gutter, not onto the footpath or back towards your house. This is especially important in areas with heavy rainfall, from Sydney's suburbs to the Hunter Valley.
- Guaranteed Compliance: A non-compliant crossover can lead to a council order forcing you to rip it out and replace it, all at your own expense. Using a professional contractor ensures the job is done to spec and signed off, giving you complete peace of mind.
Ultimately, a concrete crossover is the handshake between your private property and the public domain. It has to be built to last, function flawlessly, and meet the high standards your local council sets to keep the whole community safe.
Navigating Council Approvals for Your Crossover
Before a single shovel hits the dirt or a bag of concrete is even thought about, your first—and most critical—step is getting the green light from your local council. This isn't just a friendly suggestion; it's a hard legal requirement. Trying to build a concrete crossover without a permit is the fastest way to get a demolition order, forcing you to tear out all your hard work at your own expense.
Think of the approval process as the council's way of protecting public assets and keeping the community safe. They scrutinise every application to make sure the new crossover won’t block pedestrians, mess with stormwater drainage, or smash into underground pipes and cables. It’s all about getting the job done right from the very beginning.
Understanding What Council Looks For
Every council has its own rulebook, but they’re all playing the same game. For example, Central Coast Council is very particular about how close you can build to street trees and power poles. Over in the City of Newcastle, they’re laser-focused on gradients to make sure water doesn’t pool on the footpath.
When you lodge a vehicle crossing application, inspectors will be zeroing in on a few key things:
- Maximum Width: Councils have strict limits on how wide your crossover can be, usually based on your property's frontage and the size of your garage.
- Acceptable Gradient: The slope, or 'fall', has to be spot on. It needs to direct rainwater into the street gutter, keeping it off your property and the public footpath.
- Proximity to Assets: Your crossover can't be plonked right next to council assets. This includes things like power poles, Telstra pits, water meters, and established street trees.
- Sight Lines: The location needs to give drivers a clear view of the footpath as they exit, and pedestrians need to be able to see cars coming. It’s a non-negotiable safety check.
Putting together a solid application is the secret to avoiding frustrating delays or an outright rejection. This usually means submitting a detailed site plan showing exactly where the crossover will go, its dimensions, and the materials you'll use. It’s about showing them a clear, compliant plan that ticks all their boxes.
Key Takeaway: The council approval stage isn't optional—it’s the foundation of your whole project. A well-prepared application that follows local rules shows you're serious and makes the journey from plan to pour much, much smoother.
Putting Together a Winning Application
To sidestep the common traps, you need to know what a successful application looks like. One of the biggest reasons for rejection is a sloppy or incomplete site plan. You have to make sure your drawing clearly marks all existing assets, property boundaries, and the precise location and measurements of the proposed crossover. What flies in one council area might be an instant rejection in another.
While they’re based in Melbourne, the cost breakdowns you see there give a good idea of how much council specs can shape a project. For instance, you might see prices ranging from $65 to over $150 per square metre, and that variation is often down to local council rules for things like reinforcement mesh and concrete strength. Just as the City of Casey has its own maximum widths, every NSW council has unique standards you can't ignore.
This is where bringing in a contractor who knows the local council's quirks is worth its weight in gold. With over 15 years of experience across the Central Coast and Sydney, we’ve seen it all. We know the specific hoops you need to jump through for different councils and can help you prepare an application that gets approved without the headache. Getting the right advice early on can save you a mountain of time and stress.
For a deeper dive into the nitty-gritty, check out our guide on vehicle access crossings. It's all about making sure your project starts on the right foot, fully compliant and with a clear path forward.
Site Preparation: The Foundation of a Durable Crossover
Once you’ve got that signed-off approval from the council, it's time to get your hands dirty and prepare the ground. This is, without a doubt, the most important stage of the entire project. Rushing it is a guaranteed recipe for a cracked and sunken concrete crossover in just a few years.
A solid build starts from the ground up, and proper site prep is what ensures your crossover lasts for decades, not just a couple of seasons.
Getting the Excavation Right
The whole process kicks off with excavation. This isn’t about digging a random hole; it's a precise job to create the perfect foundation for what’s to come. The depth we need to go depends entirely on the local ground conditions, which can vary wildly even across a single region.
For example, prepping a site in a sandy, free-draining coastal suburb like Copacabana is a completely different ball game to working with the heavy, reactive clay you often find inland towards the Hunter Valley. Sandy soil might require deeper excavation to hit a stable base, while that reactive clay needs special attention to manage its tendency to shrink and swell with moisture.
We bring in our excavators to carefully remove the grass, topsoil, and any unstable material until we’re left with a solid, uniform base. The goal is to create a perfectly shaped box-out that will hold the subbase and the concrete itself. This is where professional experience really shows; knowing how different soils behave is crucial for long-term stability.
Why It Matters: Incorrect excavation depth is one of the leading causes of crossover failure. Go too shallow, and the subbase won't have enough support, leading to subsidence. Go too deep, and you’re just wasting money on extra fill material. Precision here saves you from costly repairs down the track.
Building a Bulletproof Subbase
With the area excavated, the next move is to lay and compact the subbase. Think of this as the load-bearing layer sitting directly under the concrete. Its job is to spread the weight of vehicles evenly and stop the slab from moving or cracking under pressure.
We typically use a high-quality road base or crushed rock, laid to a specific thickness—usually between 100mm and 150mm, depending on the soil report and council specs. It’s not enough to just dump the material in, either. It has to be meticulously compacted with a plate compactor until it’s rock-solid and perfectly level. A well-compacted subbase is the unsung hero of any durable concrete job.
For anyone interested in the bigger picture of groundwork, our guide on professional site preparation services dives deeper into what’s involved in getting a site ready for any construction project.
Setting Up the Formwork and Fall
The last step before the concrete truck arrives is setting up the formwork. This is the temporary timber frame that acts as a mould, holding the wet concrete in place and defining the exact shape, size, and level of your new crossover.
This is where absolute precision is non-negotiable. We set the formwork to the exact dimensions laid out in your council-approved plans. But more importantly, we meticulously set the 'fall', or gradient. This slight slope is critical for directing rainwater away from your property and into the street's drainage system, preventing puddles on the footpath that can become a real hazard.
Getting the fall right isn’t just good practice; it's a must-do. It ensures your crossover does its job without creating a headache for you, your neighbours, or the council.
The flowchart below shows how the council approval process leads directly to this on-site work.
This process highlights that every physical step on-site, from digging the first scoop of dirt to setting the final form board, is guided by the plan that has already been stamped and approved by your local council.
The Concrete Pour, Reinforcement, and Finishing
With a perfectly prepared base, the real transformation begins. The concrete pour is where your crossover takes shape, turning a patch of excavated ground into a solid, functional piece of infrastructure. It's a highly technical stage, but understanding the key components—reinforcement, concrete strength, and finishing—helps you spot a quality job when you see one.
This is where the strength and durability are literally built into the slab. Getting these elements right is non-negotiable for meeting council standards and making sure your crossover lasts for decades.
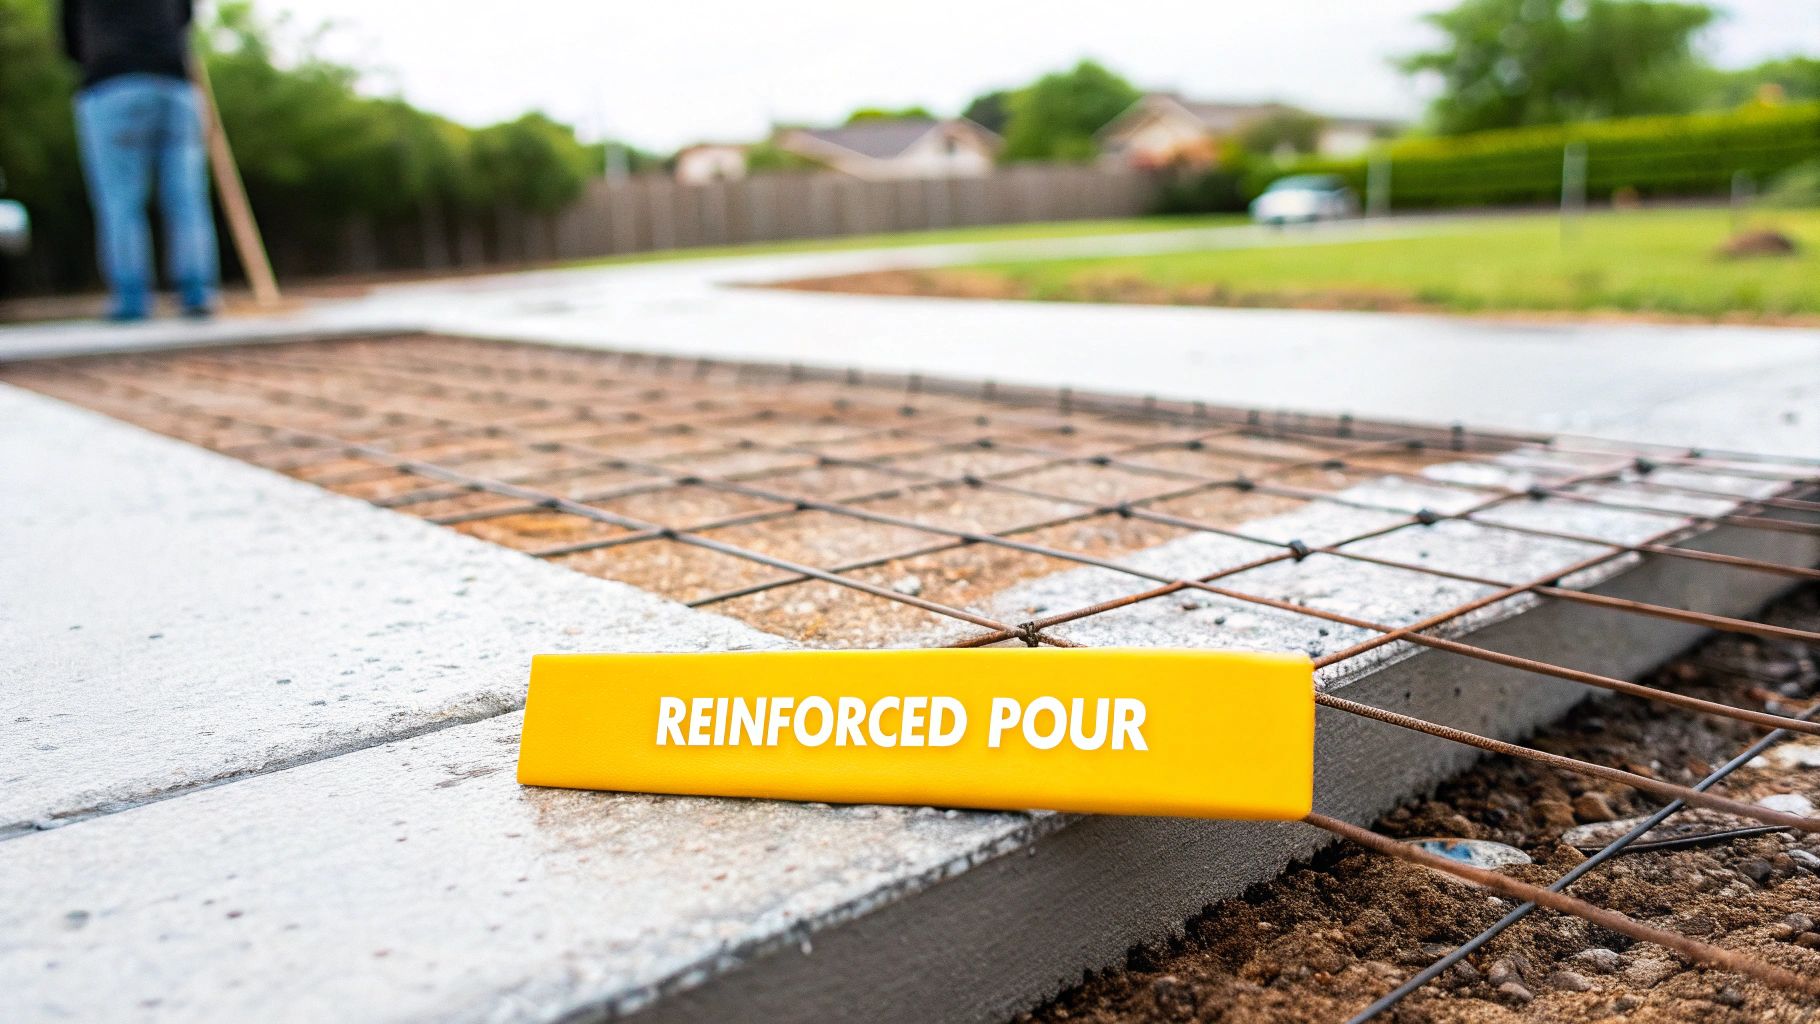
Steel Reinforcement: The Unseen Strength
Before any concrete arrives, we lay down a grid of steel reinforcement mesh, often just called 'reo'. This steel skeleton is absolutely critical. Why? Because while concrete is incredibly strong under compression (being squeezed), it's surprisingly weak under tension (being pulled or stretched).
The reo mesh provides the tensile strength needed to handle heavy vehicle loads and resist cracking from ground movement or temperature changes.
For concrete crossovers, steel reinforcement isn't just a good idea—it's a hard requirement under Australian Standards and is specified by every council, from Sydney all the way up to the Hunter Valley. It’s what gives the slab its structural integrity. The mesh is carefully placed on 'chairs' to hold it right in the middle of the slab's thickness, ensuring it does its job properly.
Understanding Concrete Specifications
Not all concrete is created equal. Your local council will specify a minimum compressive strength, measured in megapascals (MPa). For most residential crossovers in NSW, this is typically 25 MPa or 32 MPa.
So, what do these numbers actually mean in the real world?
- 25 MPa: This is your standard-strength concrete, perfect for residential driveways and footpaths. It can withstand a crushing force of 25 megapascals (that’s about 2,500 tonnes per square metre) after it has cured for 28 days.
- 32 MPa: This is a tougher, higher-strength mix. Councils often demand it for crossovers that will see heavier vehicle traffic or are built on less stable ground. It simply offers greater durability and resistance to wear and tear.
The right strength is dictated by your council's engineering standards, period. A professional contractor will always order the correct mix to ensure full compliance. Our guide on concrete slab shuttering gives you more detail on the formwork that contains this high-strength material.
Expert Insight: Using a lower-strength concrete mix is one of the biggest corners that unqualified operators cut to save a few dollars. This will almost certainly lead to premature cracking and a failed council inspection, costing you far more in the long run.
The concrete services industry is a huge part of Australia's economy, but demand for residential paving work can fluctuate. While the broader industry generated around $12.1 billion in 2024, a lot of that growth came from large-scale commercial projects. Demand for residential work, like driveways and crossovers, has softened with the housing construction market. You can read more about these trends in the Australian concreting industry to get a feel for the market dynamics.
The Pour and Finishing Touches
When the concrete truck finally arrives, the pour needs to be efficient and methodical. We place the concrete evenly throughout the formwork, using a vibrator to work out any trapped air bubbles. This step is vital—air pockets create weak spots that can lead to a total failure down the track.
Once the concrete is placed and levelled off, the finishing process begins. The choice of finish isn't just about looks; it's about safety.
For concrete crossovers, the most common and council-preferred option by far is a broom finish. After the concrete is trowelled smooth, we drag a stiff broom across the surface. This creates fine grooves that provide excellent slip resistance for both pedestrians and vehicles, especially in wet weather. A surface that's too smooth can become dangerously slick, which is exactly why a simple broom finish is the industry standard for safe, compliant work.
Curing, Joints, and the Final Sign-Off
Just because the concrete truck has driven off doesn’t mean the job is done. Far from it. The next seven days are arguably the most crucial for the long-term strength and durability of your new crossover. This is the curing period, and getting it right is non-negotiable.
People often think concrete "dries out," but that's not what's happening. It's a chemical reaction called hydration, and it needs water to work. Our main job during this first week is to manage that moisture, ensuring water doesn't evaporate from the surface too quickly. If it does, the hydration process stalls, leaving you with weaker concrete that’s prone to cracking and dusting.
Why Curing and Control Joints Are a Big Deal
We have a couple of solid methods for ensuring a proper cure. The most straightforward is to gently mist the new slab with a hose a few times a day, especially if it's hot or windy. A more hands-off approach is to cover it with plastic sheeting or damp hessian bags. This creates a humid microclimate right on the surface, trapping moisture and letting the concrete hydrate to its full potential.
At the same time, we need to talk about control joints. Those clean, straight lines you see cut into concrete aren’t just for looks—they’re a form of planned weakness, and they are absolutely essential. Concrete naturally shrinks as it cures and will expand and contract with every temperature swing for the rest of its life. Without joints, it will crack wherever it wants, creating an ugly, random mess.
By cutting control joints at specific intervals, we’re essentially telling the concrete where to crack. The cut creates a weakened plane, so when that inevitable shrinkage happens, the crack forms neatly and out of sight at the bottom of the joint. It's a simple but fundamental step in controlling the natural behaviour of concrete and keeping the surface looking clean for years to come. A lot of these same principles are vital when we construct high-quality concrete driveways as well.
The Final Steps and Getting the Council's Tick of Approval
After a few days, once the concrete has gained enough initial strength, we'll be back to strip the timber formwork. This is the first real look at the finished edges of your crossover. Of course, our work isn't finished until the site is left spotless—all leftover materials are gone, and the surrounding verge and footpath are thoroughly cleaned up.
Then comes the final, most important step: the council inspection. This is where a council officer visits the site to officially sign off on the job. They don't miss a thing, working through a strict checklist to ensure every single detail aligns with their engineering standards and the plans we submitted for approval.
What Are Council Inspectors Looking For? They'll get the tape measure out to check dimensions, verify the 'fall' or gradient is correct for drainage, inspect the surface finish to ensure it's not a slip hazard, and confirm the crossover's position is spot-on relative to your boundary and any public assets.
Passing this inspection is the final green light. Once your crossover has the council's seal of approval, it’s officially ready for action. The barriers come down, and you can finally start using your new, fully compliant vehicle access. It's the moment that all the careful planning and hard work pays off.
Choosing the Right Contractor for Your Crossover
Hiring the right contractor is easily the most critical decision you'll make for your concrete crossover project. A suspiciously cheap quote is almost always a sign that corners are being cut, which can lead to costly defects, compliance failures, and even council-ordered demolition. The only way to guarantee a result that’s safe, legal, and built to last is to partner with a professional team who understands the specific requirements from day one.
This is about far more than just pouring concrete; it’s about finding a team that can manage the entire process. A quality contractor should handle everything, from helping with the council application to coordinating the final inspection, making sure every detail meets strict regulations. You need a partner who gets it right the first time.
What to Look For in a Civil Contractor
When you start vetting potential contractors, you need to dig a little deeper than just the price tag. A few key questions can quickly separate the seasoned professionals from the risky operators. A reputable company will have no problem giving you clear, confident answers.
Start by asking about their experience with your specific local council, whether it's Central Coast Council, City of Newcastle, or a council in Sydney. Each one has its own unique specifications, and a contractor who already knows the local rulebook is invaluable. They should also hold current public liability insurance and be able to provide you with a certificate of currency without any hesitation.
Key Takeaway: Always insist on a detailed, written quote that breaks down every single cost, from excavation and materials to labour and council inspection fees. Vague or verbal quotes are a massive red flag and leave you completely exposed to unexpected costs down the track.
Experience and Expertise Matter
A durable concrete crossover is built on the groundwork laid by an experienced crew. When you're looking at contractors, ask if their team includes skilled groundworkers, as their expertise is the true foundation of the entire structure. With over 15 years of experience on the Central Coast, we’ve seen what a truly professional, compliant service looks like.
The concrete industry in Australia is a big deal, with the market projected to hit USD 88.5 billion by 2034. This growth is driven by major infrastructure projects and a real push for high-quality materials, highlighting just how important it is to choose contractors who are up-to-date with industry standards and best practices.
Ultimately, you’re looking for a contractor who puts compliance first, strictly adheres to SafeWork NSW guidelines, and guarantees their workmanship. Choosing the right team gives you peace of mind, knowing your investment is secure and your property access is safe. For more tips, check out our guide on finding local concreting services you can trust.
Your Crossover Questions Answered
We get asked a lot of questions about building concrete crossovers. It's a common project, but there's a fair bit involved. We've put together answers to the most frequent queries to help you get your head around it.
How Long Does a Concrete Crossover Take to Build?
Realistically, you should plan for a timeframe of 4 to 8 weeks from the moment you start the process to when you can finally use it. The biggest variable here is almost always the council. Getting the application submitted, assessed, and approved can easily take a month, sometimes longer if your property has unique challenges.
Once the green light is given, the actual on-site work moves pretty quickly. Excavation, forming up, and the pour itself can often be wrapped up in just a few days. But then comes the crucial waiting game: the concrete needs to cure. You absolutely cannot drive on it for a minimum of 7 days to give it time to gain the necessary strength.
Can I Build My Own Concrete Crossover?
Look, we strongly advise against going down the DIY route for a crossover. This isn't like pouring a small garden slab; you're building a piece of public-facing infrastructure on council land, and the standards are incredibly strict for a reason.
The risks are huge. You could fail a council inspection, which means ripping it all out and starting again. Worse, if your non-compliant work causes an accident or injury, you could be held personally liable. Licensed contractors don't just have the experience—they carry the necessary public liability insurance and know exactly how to meet the specific engineering standards each NSW council demands. It’s a costly mistake to try and cut this corner.
What Is the Average Cost of a Concrete Crossover in NSW?
Trying to pin down an "average cost" is tough because no two jobs are the same. The final price tag depends on a whole range of factors that go way beyond just the size of the crossover.
What really drives the cost?
- Site access: Can we get machinery in easily?
- Excavation: How much soil needs to be removed? Is it on a slope?
- Council fees: These vary between municipalities for applications and inspections.
- Specifications: The required concrete strength and type of reinforcement mesh mandated by council engineers will also play a big part.
Any professional quote worth its salt will break down all of these costs for you, so you know exactly where your money is going.
Ready to get your project started the right way? The team at Booms Up Civil Group has over 15 years of experience delivering fully compliant concrete crossovers across the Central Coast, Sydney, and Newcastle.
Get in touch for a detailed quote and expert advice. Visit us at https://boomsupcivil.com.au or call us today.